You've all probably heard of the basic method of adjusting monitors with SMPTE bars, but that method does not address the most important aspect of your monitor - its white point. The vast majority of monitors and televisions today conform to the Rec. 709 (ITU-R BT.709) standard, which specifies a white point for monitors at D65 or 6500 Kelvin. Below is a chromaticity diagram, which shows the Rec.709 gamut (the black triangle), and in the center you will see D65, the white point.

Note that on the diagram, the coordinates of D65 fall at x = 0.3127 and y = 0.3290. These are very important coordinates, because if your monitor does not produce white at (or close to) these numbers then you've got a problem. The good news is that if you have a Sony monitor, then there is a simple and relatively affordable solution to calibrate your monitor. Sony's aptly named Automatic White Balance Software works with a variety of probes to quickly calibrate your Sony monitor. It works with the vast majority of Sony LMD, PVM and BVM monitors, only the entry level LMD 1510W, LMD 1530W and LMD 2110W are excluded. This means you can use it with the new OLED monitors, as well as the wide variety of professional LCD monitors that Sony produces.
Determining an exact white point is not something that humans can do well, which is why you'll need a monitor probe. The software works with some really nice (and expensive!) monitor probes, but the most bang for your buck is the X-Rite i1Pro 2. For around $1000, you can get set up and calibrating quickly. Below is an outline of how to use Sony's software with the X-Rite.
1) Install the Sony software. It is only Windows-based, so us Mac guys need to be able to dual-boot or run Windows virtually.

2) Plug in your probe via USB. You'll need to install some basic drivers, which will be included with the probe.
3) Run the Sony software and choose your X-Rite probe from the drop-down box. Now calibrate the probe by placing it on a black surface and clicking on the calibrate button.

4) Connect to your monitor via an Ethernet cable. You can do this over an existing network, but I recommend connecting directly from your computer to the monitor.
5) Set a local IP address on your computer's network so that the monitor and computer can talk. Open up your Network Settings and set your IP address to 192.168.0.200 and Subnet to 255.255.255.0. This IP is in the same range as the monitor, so you can connect easily. If you aren't sure how to set an IP, then check out this tutorial for Windows 7 users.

6) Enable remote control on your monitor by setting the Serial Remote mode to Ethernet and, because we are connecting directly, set the connection mode to Peer to Peer. These settings could be in various menus on different monitors; here is the setting I changed in the Sony PVM-2451 monitor I was calibrating.

7) In the Sony software, click on Network Adapter, and locate the adapter with the IP you specified earlier.

8 ) Choose Connection Type Peer to Peer, and the software will start looking for the monitor. If all goes well, it should connect right away.

Your monitor should be listed in the Target area. Also in the Target area of the screen, are x and y values that are defaulted to the specs for Rec. 709, just like I mentioned above.
9) Before calibrating you will need to feed a HD-SDI signal into your monitor - any valid signal from a camera, deck or generator will do. This is required on most Sony monitors for the process to work, but not the BVM monitors.
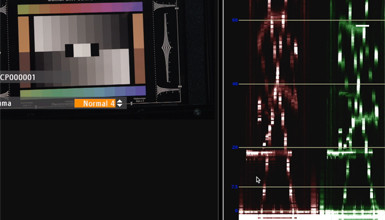
10) Set the Color Temp to User - this will enable the probe to adjust the color as needed. The default User should be a copy of D65. Here is what this setting looks like in the PVM-2451.

11) Place the probe on your monitor in the center of the screen. The X-rite comes with some hardware that makes it easy to hang in front of the monitor.
12) Now start the calibration process by clicking the Adjust button in the Luminance area. Note the Y (Luminance) value above is defaulted to 100; you can adjust this based on your viewing environment if required.

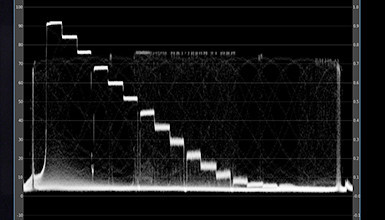
12) After clicking Adjust, the monitor will start to display patterns on the screen that are used to adjust the white point of the monitor at various luminance levels. Give the calibration a few minutes to complete, and watch as the white point of your monitor is adjusted as close as possible to the target.

13) You're done! As you can see after the calibration, my measured (current) x & y values are a very close match to the target values of a proper Rec. 709 white point. With this simple measurement you can be confident that your monitor will be in spec for the vast majority of applications.

One option that you can consider when matching different types of monitors is choosing D65 from the Set To drop-down under Set To. This will produce x & y values with different offsets based on your monitor type. LCDs and OLEDs tend to look different even at matching white point values, so these offset will help adjust for that. As you can see below, my PVM monitor has specific offsets that Sony has determined.

If you want to learn more about monitor calibration, make sure to check out our Digital Technician: Monitor Calibration classes coming up in LA and NY!