


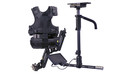
Overview
The Steadicam AERO Sled with 7" Monitor + A-15 Arm + SOLO Vest + Gold Mount Battery Plate delivers a complete stabilization package for your camera package up to 10 lb capacity. Since the AERO handheld pole is tool-free, you can quickly make adjustments to update your camera rig to suit the situation.
The AERO Sled
The AERO Sled connects your monitor, your camera, and the support arm together so a single operator can manuever camera position with smooth gimbal stabilization. This vertical pole takes up less space than some gimbals so you can manuever in hallways or tighter space. It also offers a monitor mount which pivots for easy viewing by the operator.
Features:
- Telescoping, 2-section, high modulus carbon fiber post
- Tool-free sled for easy adjustments and field maintenance
- Quick-release camera plate locking system
The AERO includes multiple components (from the top down):
Quick Release Plate - a slide-loading safety catch which supports your camera and lens package.
The Stage - allows for find balance adjustments and contains your power and video connections.
The Post - provides a textured grip surface to control camera pan and tilt. Also features the Gimbal Handle which connects The Arm and controls the boom height. Just above the base is a Post Lock where you can adjust the length of your post.
The Base - a cross rod (perpendicular to the pole) which supports the balance weights, monitor mount (which pivots for easy viewing), and battery mount, plus a quick release to disconnect the cross rod. The base of the lightweight AERO sled detaches from the post for compact storage and easy transportation.
Remember that mounting your camera on the AERO Sled is the critical fist step to balancing your Steadicam system. That includes locating the center of balance for your fully loaded camera. Steadcam offers a helpful video on how this process is done. Be sure to add all the components and accessories to your camera setup before mounting. Be sure to weigh it as well to confirm it is within payload capacity for the system.
Static Balancing is the primary method of balancing the AERO. It typically results in a vertical Post with the camera above. If your camera is lightweight, you can add balance weights to the corners beneath The Stage.
NOTE: Always add weights symmetrically, like you would when tightening bolts while changing your tires.
If your camera includes an LCD screen which flips out, Steadicam suggests you close it to ensure it doesn't upset your balance. Besides, with the on-board monitor in this system, you won't need that LCD, except for camera settings which you would adjust while standing still.
The Monitor
The included 7" 1000 nit on-board monitor is powered from the AERO via a mini-XLR port. A convenient mounting bracket is provided. Steadicam suggests operating the monitor with a 45° angle to the cross rod.
The Solo Vest
The lightweight Solo Vest features a payload capacity of up to 10lb (approx. 4.5 kg). This is the thinnest and lightest vest which Steadicam offers. You can wear it under a tuxedo jacket, if you need your camera operator to fit into a crowd scene. The vest itself weighs about 2.6 lb (approx. 1.178 kg) and fits to your torso with hook and loop straps for a wide range of body size adjustability. It also features nylon buckles for quick access and removal.
Vest Sizing Choice for Operators:
- Weight Under 100lbs / Height up to 4'6"
- Weight Over 100lbs / Height over 4'6"
Steadicam offers a product manual with instructions for proper vest fit. You can also learn about that in a Steadicam training class at AbelCine.
Gold Mount Battery Plate
Attach this Gold Mount Battery Plate for Anton Bauer and other suitable batteries to your Steadicam AERO 30 stabilizer. Power accessories with this battery mount using the D-Tap connection on the plate.
NOTE: Batteries sold separately.
The Steadicam Arm
The Steadicam Arm supports the weight of the AERO Sled while helping isolate the camera from the operator's movements. In that way, your footage does not reflect uneven ground or the slight bouncing/jostle which occurs when someone shoots handheld footage without stabilization. The Arm facilitates booming the camera up and down. The lifting strength of The Arm is adjustable to accommodate a wide range in payload. It also incorporates side-to-side adjustment wheels which help align the lifting axis to your body.
The Arm includes: an Arm Post which connects to the Post Block (where your camera sits or where the Steadimate will interface with the Steadicam Arm), springs in the forearm and upper arm sections, a double action hinge (where the elbow would be, if this was your body), and two lift adjustment knobs which are only adjustable under load. The socket arm (which connects to your Steadicam Vest via the Socket Block on The Vest), features a socket quick release pin and side-to-side adjustment wheels to align The Arm to your body.
IMPORTANT NOTE: Remember to keep a hand on the end of The Arm as you connect it to your vest. Otherwise, The Arm might swing out or even in to accidently injure someone or somthing around you, or to impact against your body or face.
Lifting the System
Steadicam and AbelCine recommend you learn how to use a Steadicam System via a hands-on course. If you aren't ready for that and are just wondering how the system functions with you in it, there are a number of video blogs available for you to view on the Steadicam in action.
Remember that you will put on your Vest (after adjusting it properly), then connect The Arm, then approach your AERO Sled (which should be resting on an appropriate docking stand with the camera already in place and balanced). You would simply bend forward to place the Arm Post into the receiver on the Post Block. Please remember to bend at the hips for this maneuver, almost like a bow. You will find that raising your gimbal camera rig on the dock/stand so that the Stage is roughly at shoulder height is a more comfortable position to make the proper connection.
At this point, you should step forward so that The Arm takes the weight of the AERO and compresses the connection fully. Now you can lift the unit from the docking stand and step backwards. Make sure to do all of this in a non-crowded area, if possible, to prevent accidental collisions.
Moving with Your Steadicam Vest & Arm
Stand up straight whenever possible so you can let the Steadicam Vest and Arm do all the work. Steadicam suggests you maintain most of your weight on one foot so you can move in any direction at any time.
Push the rig away and lean back slightly.
Push the rig to one side and lean slightly to the other side.
Similar to traditional Steadicam operating, start and finish every move with your arm. Simply move the Steadimate System in the direction you wish to travel, then follow along with your feet.
Always use a spotter when walking backwards to keep you safe.
Extend your range of movement by sitting, kneeling, or stepping up onto objects like apple boxes, curbs, steps, etc.
Should you decide to use a dolly or other form of moving vehicle, please take caution to protect you and your equipment.
Be careful where you place your fingers so they will not be pinched when you raise the arm.
With the Steadicam AERO you can also perform a Body Pan. Simply rotate your foot and hinge your entire body afterwards.
Remember when tilting the camera that your body does not follow the tilt, use the grip to make this maneuver with your hand instead.
Be sure to read up on how to balance and center your camera using Steadicam's appropriate product manual or you can attend one of AbelCine's Steadicam training classes across the nation.
Steadicam Accessories
There are multiple accessories which are available to expand the features of your gimbal rig, including an optional: docking bracket, stand, sandbags, additional balance weights, arm post adapters, and battery mounts for V-Mount, etc.
What's in the Box
- Limited 1-Year Warranty (Parts)
- 8 x Balance Weights (4 oz each)
- 1/2" Docking Bracket (80407900)
- Monitor Mount
- 7" HD Monitor (MSC-200595)
- Cross Rod
- 2-Section Carbon Fiber Center Post
- AERO Camera Mounting Chassis / Sled
- A-315 Support Arm
- SOLO Vest
- Limited 6-Month Warranty (Labor)
Specifications
Key Highlights
- 10 lb payload capacity
- Telescoping carbon fiber post
- Tool-free AERO sled for fast adjustments
- 7" 1000 nit on-board monitor
- 2.6 lb SOLO Vest is lightest in lineup
- Gold Mount Battery Plate
- Arm isolates operator movement


