


Downloading C300 Footage
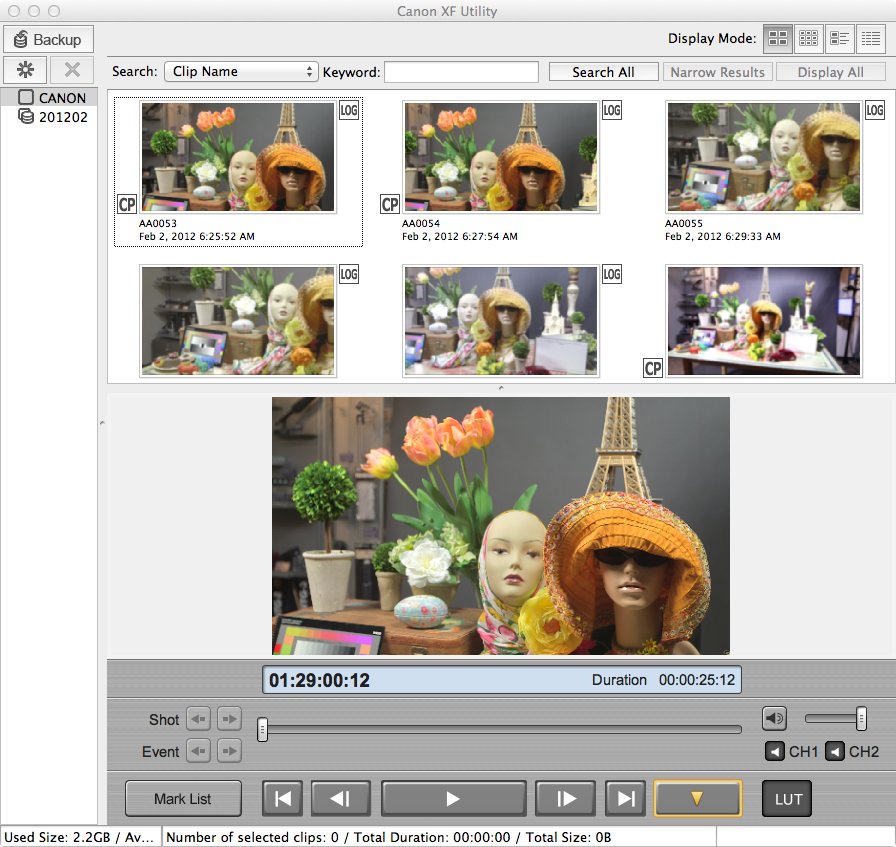
Canon provides a piece of software called the Canon XF utility, which is used to playback and download clips off their original media. It also has the ability to view clip metadata, mark timecode, and even apply a LUT to Canon Log footage for viewing. The XF Utility is available for download here on Canon's site. The C300 records to Compact Flash cards, so a simple CF card reader is all that is needed to attach C300 media to your computer. Launching the XF Utility gives you the window below:
 (Click for full size)
As you can see, my attached CF card showed up as the 'Canon' drive in the upper left corner. The drive underneath '201202092901' is some previously backed up footage. The name is based on the time of the backup. Looking at the image above, you can see that some clips have the letters 'CP' in a box next to them. This means that a custom picture profile was used when recording the video. Clicking on View -> Custom Picture in the menu reveals exactly what was set in the camera.
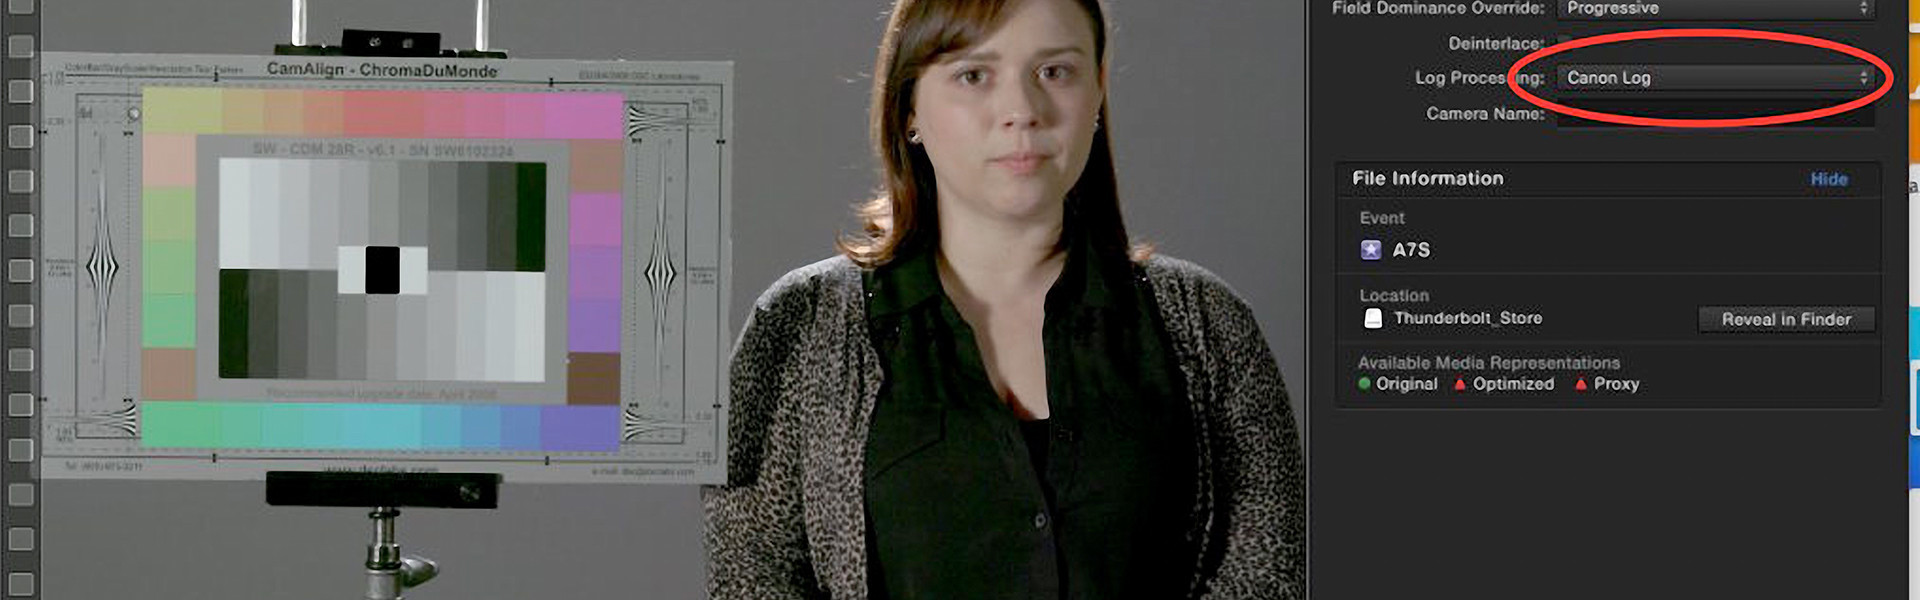
 The word 'LOG' appears next to some of the clips, letting you know the footage was shot in Canon Log Gamma mode. At the bottom of the utility, there is a button labeled 'LUT.' This is meant to turn on a Look Up Table that makes the Canon Log footage look more normal. On my system this did not seem to have an effect, but the intent is to make it easier to preview the end result of color grading Canon Log footage.
The footage on the CF card can be backed up with the XF Utility by clicking on the 'Backup' button on the upper left corner. Before doing so, make sure you set the location to store your footage in the Preferences menu.
 Backing up the footage will store the clips in a unique folder based on the date and time of the transfer. Here is the folder structure that results:
 Now my footage is backed up and ready for ingesting into an NLE. Make sure you always back up your original Canon footage before ingesting into any editor. This original footage contains information that will be lost when converted into a QuickTime MOV for Final Cut Pro, but it works natively with AVID and Premiere.
Final Cut Pro 7
To bring your Canon C300 footage into Final Cut Pro 7, use the Log & Transfer function. This requires the latest Canon XF Plugin for Final Cut Pro, which is included in the above download or can be found here. Once this plugin is installed, you can launch Final Cut Pro to begin the import process. In Final Cut Pro, launch Log & Transfer:
To locate the C300 footage saved by the XF Utility, click on the folder icon in the top left corner of the Log & Transfer window. Locate the folder you downloaded:
![]() Make sure to select the top folder to open. If you select anything below the top folder, FCP will not recognize the footage. Now your footage should load, and you can start trimming and adding notes to each clip as needed. Anything done in this window won't effect the original footage but will be stored in your FCP project file. Before bringing in any clips, we want to adjust the way clips are imported by Log & Transfer. Final Cut 7 works best with clips in the MOV format, but Canon clips are stored in the MXF format. Because of this, Log & Transfer will either convert the footage to ProRes or just re-wrap clips into MOV format. Re-wrapping means that the video is not recompressed, but rather just put into the MOV holder that Final Cut likes best. To change this setting, click on the small flower-shaped icon in the top middle of the Log & Transfer window, which will open the Import Preferences panel.
Make sure to select the top folder to open. If you select anything below the top folder, FCP will not recognize the footage. Now your footage should load, and you can start trimming and adding notes to each clip as needed. Anything done in this window won't effect the original footage but will be stored in your FCP project file. Before bringing in any clips, we want to adjust the way clips are imported by Log & Transfer. Final Cut 7 works best with clips in the MOV format, but Canon clips are stored in the MXF format. Because of this, Log & Transfer will either convert the footage to ProRes or just re-wrap clips into MOV format. Re-wrapping means that the video is not recompressed, but rather just put into the MOV holder that Final Cut likes best. To change this setting, click on the small flower-shaped icon in the top middle of the Log & Transfer window, which will open the Import Preferences panel.
![]() Scroll down to the Canon XF Plugin section to can choose how the footage will be imported. It defaults to ProRes, which will make the imported files larger and also increase the import time considerably. You can instead choose to bring in the files in 'Native' mode, which will allow you to edit in the camera's original format. FCP is designed to work best in ProRes, but the native format edits just fine. Because ProRes is generated from the original C300 footage, there is no quality improvement in the video when converting to ProRes. Depending on your workflow, choose what fits best. Click OK when you are done, and continue to import your footage by clicking 'Add Selection to Queue.' Now your footage is in FCP 7, and you can start editing.
Scroll down to the Canon XF Plugin section to can choose how the footage will be imported. It defaults to ProRes, which will make the imported files larger and also increase the import time considerably. You can instead choose to bring in the files in 'Native' mode, which will allow you to edit in the camera's original format. FCP is designed to work best in ProRes, but the native format edits just fine. Because ProRes is generated from the original C300 footage, there is no quality improvement in the video when converting to ProRes. Depending on your workflow, choose what fits best. Click OK when you are done, and continue to import your footage by clicking 'Add Selection to Queue.' Now your footage is in FCP 7, and you can start editing.

Avid Media Composer 6
To bring your Canon C300 footage into Media Composer 6, we are going to use the AMA function. This requires the latest Canon XF Plugin for Avid Media Composer, which is included in the installer above or can be downloaded here (click on Drivers & Software, and then chose your OS). Make sure to get the 64-bit version if you are running OS X Lion, as this is not included in my installer above. Once these plugins are installed, you can launch Media Composer to begin the importing process. When you are in Media Composer, click on 'AMA' under settings.
 Open 'AMA', and click on Volume Mounting. Enable AMA Volume Management.
 Click 'OK.' Now you can link to the footage. To do so go to File -> Link to AMA Volume. This will open a finder window for you to locate the footage.
 As you can see from the image above, I have a Canon folder with two different stored cards in it. If you choose to click on one of the stored folders, say '2012020220510,' AMA will make a bin with the same name and populate it with the C300 footage inside that folder. If I choose to bring in the Canon folder itself, AMA will ask how I want to bring in all the different footage inside.
 You can bring the footage from each stored card into individual bins or together. I chose to bring the footage in based on the SubFolder name, so I will get a bin for each card stored. Now my populated bins look like this:
 You can see that the bins have the same name as the folders I imported. Each clip has a tiny link icon next to it, which indicates that it is an AMA clip. In MC 5.5, AMA clips appeared yellow. In MC 6, the link icon appears instead. We can now start editing the material, or we can choose to transcode it to Avid format through Clip -> Consolidate / Transcode.

Adobe Premiere 5.5
To bring your Canon C300 footage into Premiere 5.5, you don't need any special software. Premiere supports a huge range of formats without any plugins. To start, launch Premiere and make a new project.
 Select 'New Project,' and then choose your settings to get going.
 Select from the Canon XF MPEG2 drop down menu, and choose the format in which you shot. I shot in 1080 24p. Click 'OK,' and Premiere will open up. To import clips visit the "Media Browser" window, which is normally found in the lower left corner of Premiere. Otherwise you can open it by going to Window -> Media Browser. In the Media Browser locate your clips:
 Choose the folder with your C300 footage into it and Media Browser will allow you to view your clips. Media Browser assembles any spanned clips as well. Bring the clips that you wan to import into your project by either dragging them into the project window, or choosing File -> Import from Media Browser. Premiere will look through the folder for anything it can bring in, but because it only reads the actual Canon MXF files you will get some errors. Now your clips are in Premiere and ready to edit, special thanks to Adobe for helping get this right.

Apple Final Cut X
Update - FCP X now supports Canon XF footage with a Canon plugin.
Final Cut Pro X is getting better every day, and version 10.0.3 brings a lot of updates, including multi-cam editing and support for external IO devices like AJA's Io XT. Previously Canon did not have a working plugin for Canon XF material, but now they have update their site with a plugin that works well. Visit the Canon site to download the latest version. After installing the plugin, launch FCPX and click the little camera import button.
 The camera import window will open. Click on "Open Archive" to find your Canon footage.
![]() Select the folders containing the Canon "Contents" folder, mine are called 20120202092901 based on the date/time of transfer. Don't choose the Contents folder itself. Now the import window will show all your clips.
Select the folders containing the Canon "Contents" folder, mine are called 20120202092901 based on the date/time of transfer. Don't choose the Contents folder itself. Now the import window will show all your clips.
 Choose the clips you want and click the import button on the lower right hand.
 Now Final Cut X is ready to start editing. Thanks to Canon for getting the new plugin working so quickly.
 For an even more in-depth look at the C300 and its workflow, check out our C300 Workshops coming soon up in NY and LA.

