
The most important thing to know about Canon Log is where your middle gray level should fall. The all-important 18% reflectance middle gray level is our reference when using a light meter or when using a waveform. Generally in standard video modes, the middle gray level would land around 50% on a waveform scale, but with Canon Log (like other Log curves) this middle gray level is intended to fall much lower. In the graphic below, you'll see a mapping of Canon Log on a Video Percentage (waveform) vs Reflection Percentage graph.
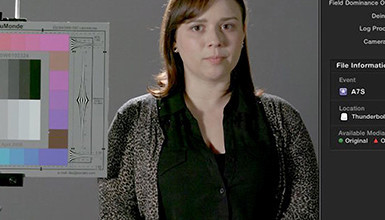
 In the above image, you should notice that the 18% reflection is expected to fall at 32% on a waveform - this is considerably lower than you would normally expose your image. Just to give you an idea of what that looks like, here is a quick shot from outside our office with a gray card set to 32% on the waveform.
 You can see that the image looks relatively dark. Canon does this to preserve the most highlight information within your image - look closely and notice how much information I've retained in my highlights. When I apply their De-Log LUT, I get this image. You can download our Canon De-Log LUTs here, which I have converted into various formats.
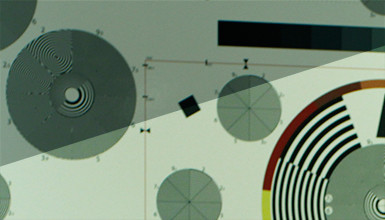
 Now you see that the 32% gray card is at 50%, and the image looks relatively normal. Some highlight information is gone in the image, but through grading I can bring it back easily. We can see that exposing middle gray at 32% seems to work, but it's important to note that not every situation calls for following this rule. If you aren't concerned with controlling highlights, like in a studio shoot for instance, then you can certainly raise your exposure and adjust the LUT for fine results. Just keep in mind the effect it will have on the number of stops, or dynamic range, above your middle gray level.
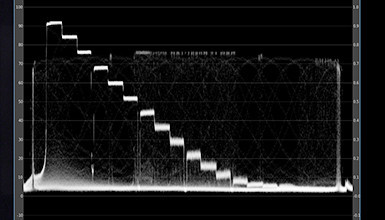
In Log mode, I'm always going to be looking for the clipping in my recorded image. Remember, shooting in Log doesn't mean you can't clip. But if you are a DP that primarily uses a light meter, Canon also specifies a number of stops above or below middle. Here is what that looks like:
 Notice that at 850 ISO and above the number of stops above and below middle remains the same. Without going too deep into how this works, Canon is basically using an Exposure Index (EI) shift up to 850 IS0, and above that they are adding more traditional image gain. They use EI to get to nice split in the stop range, and then add gain evenly from there. This is different than what we see in the ALEXA and F65, but rest assured that the ISO readings will hold true and the stop range will remain consistent above 850.
Now I'll return to what I said before about exposing your middle gray higher in some situations. Say I'm shooting indoors and I'm not concerned about highlight control at all. Here is an example of shooting indoors at 32% middle gray level, and next to it is the same image with the LUT applied.
 You'll notice that's it is pretty darn dark looking before the LUT, but it's still working alright. Now here is the same setup again with a 40% middle gray this time, and a corrected LUT applied.
 So the image is still looking pretty good, right? What's the difference? Well it has less highlight control, sure, but because I've exposed the middle levels higher, my relative noise floor is lower. So the overall image is a bit cleaner. This means it's OK to do this; it works either way. If you aren't able to adjust your LUTs on the fly and want to use the internal 'View Assist' LUT mode on the camera, then it might just be easier to stick with the 32% rule throughout.
Finally, a big concern from many of us shooting Log on the C300 is the fact that it is an 8-bit camera. Talking to Canon, they insist they are using the "right 8-bits," and as funny as that sounds, it seems to be true. Grading the image in post has been a breeze for most that use it. Looking back at the white paper you'll find this:
"If the video processing in the camera has been well implemented at higher bit-depths (and appropriately rounded to the 8-bit representation) then the postproduction processes will not see much distinction from a full 10-bit interface. The Canon-Log curve was optimized for this 8-bit coding. This optimization reflected theoretical studies in addition to extensive subjective testing in collaboration with the major post-production house Imagica Inc."
Canon has designed their Log curve for working in 8-bit. If you look back at the graph from earlier, you'll note that the 0% reflectance level is at 7.3% on the waveform, and 90% reflectance is at 62%, so a wide range of information is stored in a relatively small area of the recorded data. This seems to make sure that the important information is stored in the relatively small bit bucket.

If you've shot Log, let us know how your experience has been. If you'd like to learn more about shooting in Log, keep an eye out for our Digital Imaging workshop series in NYC and LA.