Apple's FCP X has just been updated to support the new XF-AVC 10-bit format found in the C300 Mark II. This is great news for anyone wanting to work with the camera and FCP. Previously, Canon had been giving away an Adobe Premiere subscription with the camera to make sure everyone was up and running.
Below is a brief breakdown of how to use the new footage in both Canon's own software, as well as FCP X (v 10.2.3), Premiere Pro (2015.2), AVID Media Composer (v 8.4.5), and DaVinci Resolve 12. Note the versions of the software, if you are running earlier versions then compatibility cannot be guaranteed.
Canon's XF Utility for XF-AVC
Canon has provided a new piece of software for working with the 10-bit XF-AVC format found in the C300 Mark II. This software is called the Canon XF Utility for XF-AVC - pretty literal name, I know. You can download the software from various Canon sites across the globe, but the European site seems the most up to date.
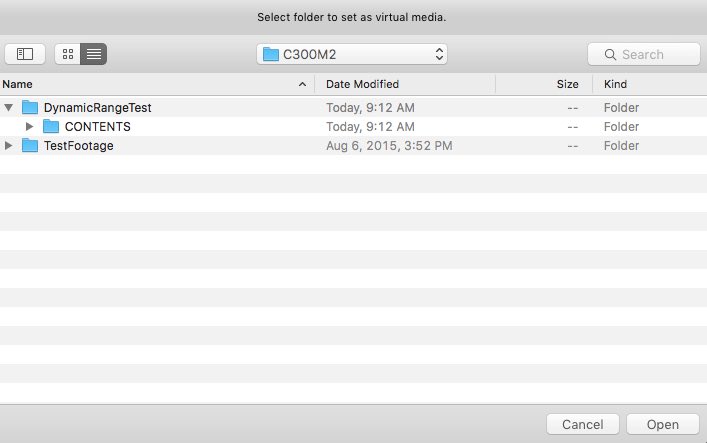
 The software downloads and playbacks footage from the camera media. The above image is what you would see once the media is mounted. To mount existing media already downloaded, go to File -> Set Virtual Media. Then you'll be able to select the media you've already downloaded; make sure to select the folder containing the 'CONTENTS' folder, my folder is called DynamicRangeTest. This will create a 'virtual media' folder with all your clips in it, and you will see a list of folders on the left side of the main screen.
 To mount media still on a card, go to File -> Create Virtual Media, and then select the media card you have connected to your computer. The software can backup your footage to one or two locations. The 'Backup' button in the top left corner allows you to do this. First you must set your back up locations, so go to Preferences, and then to the Backup tab.
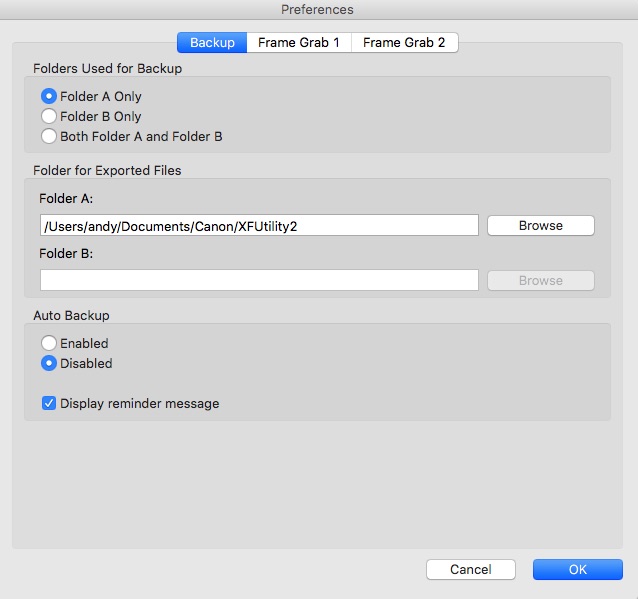 As you can see above, in this window you can set the backup locations and if you want to back up to just one location or both.
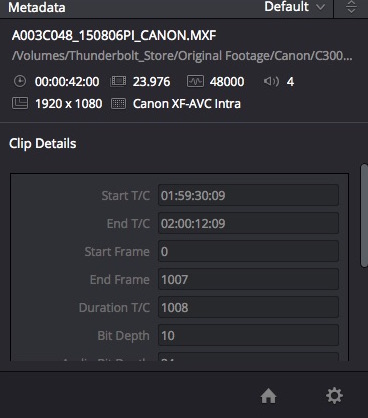
Once you have footage mounted, then you can play back clips and check metadata. Under the View menu you can see Custom Picture Settings, Camera Metadata, and other clip properties. Below is an image of the camera metadata, which is pretty handy as it lets you see the lens focal length, stop, shutter speed, and more.
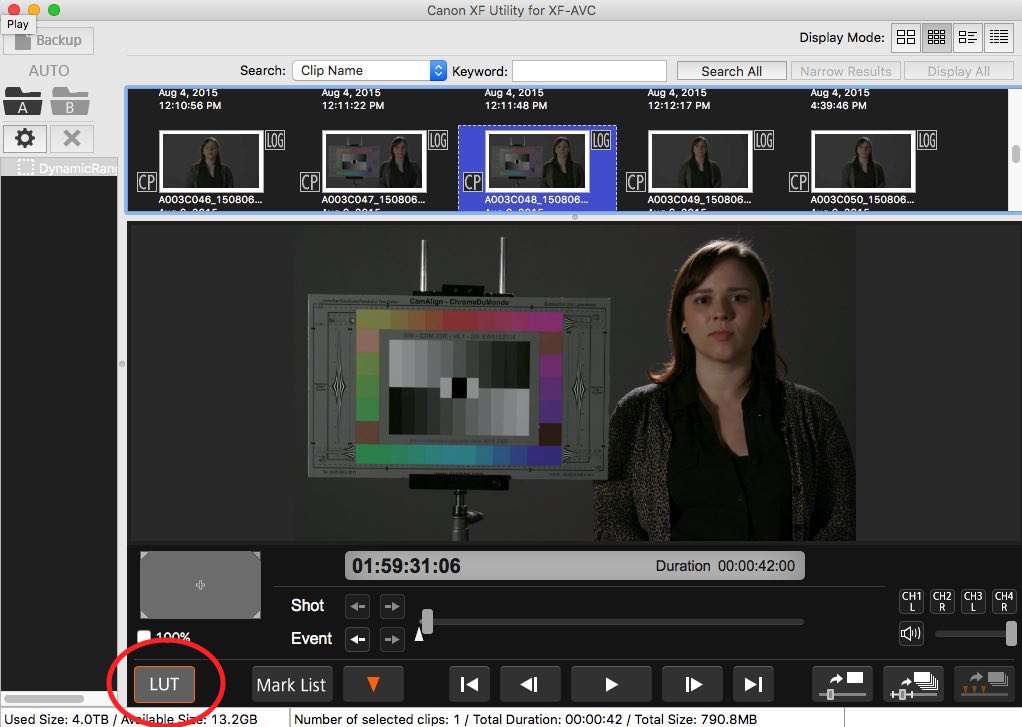 Finally, a nice option is that the software can also apply a LUT (look-up table) to the images if you shot the clips in C-Log or C-Log2. Just click on the LUT button in the lower left corner of the page to apply it. This will make your Log images look better for viewing purposes, but it has no effect on the actual files.
Apple Final Cut Pro X
Apple just released an update to FCP X to enable the 10-bit XF-AVC format found in the C300 Mark II, so make sure to update to the latest version via the Apple App Store. After that, you'll also want the latest Canon XF Plugin for FCP X, which you can also download from the European Canon site. The Canon plugin isn't required, but it certainly makes the importing process more streamlined in FCP X.
Once you have all of this updated and installed then you can import the media into an FCP X event. To do that go to File -> Import -> Media, or click the down arrow on the left side (middle) of the program.
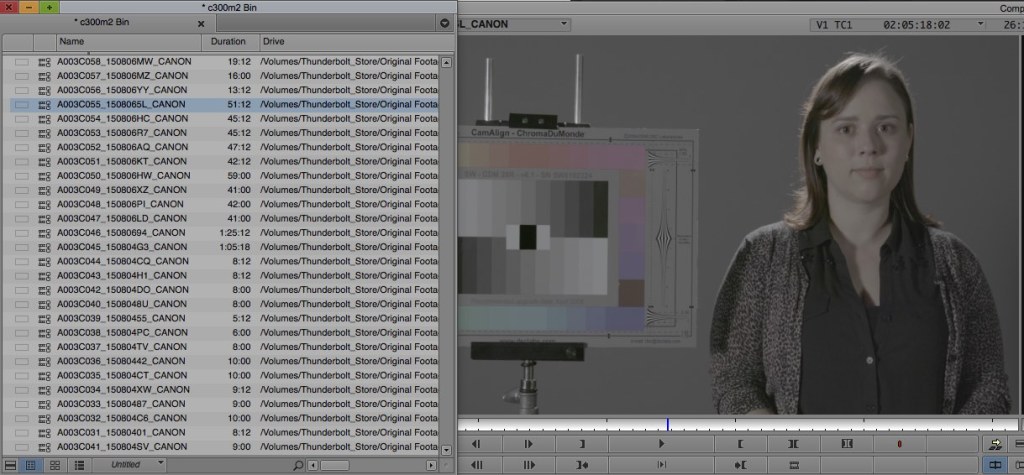
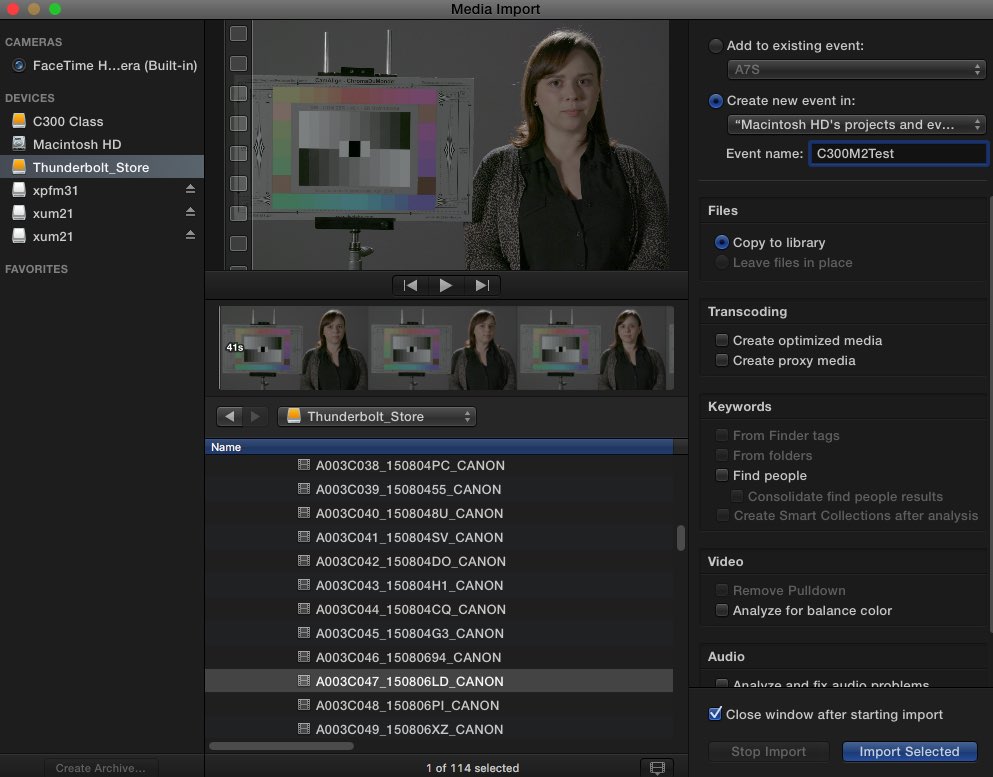 As you can see in the image above, I have located my 'DynamicRangeTest' folder and all of my C300 Mark II clips are present and accounted for. Now you can simply select the clips you want, set an Event to import them into, and click Import Selected.
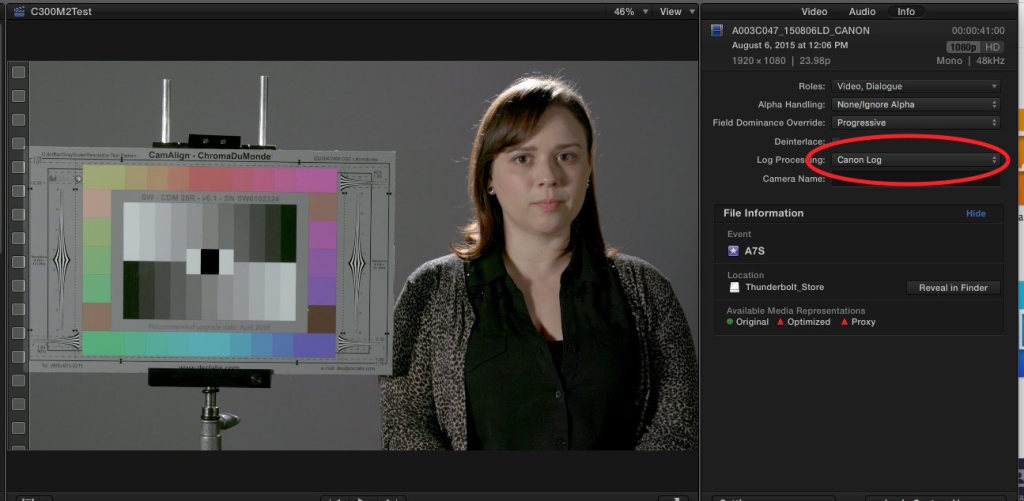
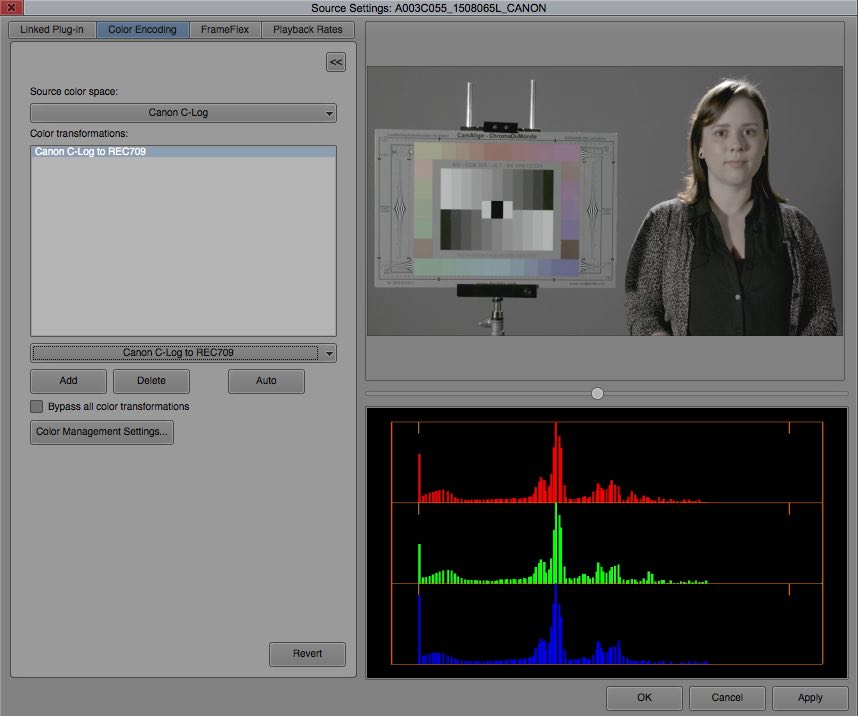
Once loaded into FCP X, there is one more option worth noting. When you select a clip from the camera in FCP, there is a 'Log Processing' option under the info tab found in the upper right corner. Here you can select Canon Log to enable a basic LUT. We technically shot in Canon Log 2, so this might not be the correct LUT to use, but it works in a pinch.
Adobe Premiere Pro
Adobe has supported the XF-AVC format for many months now, and importing the footage is just like working with any other format.
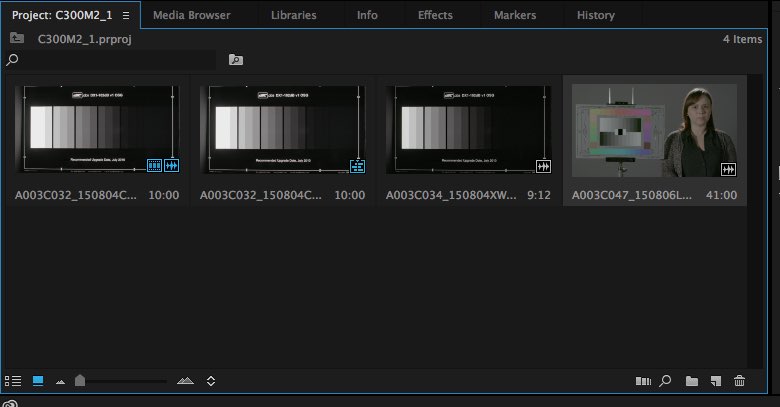
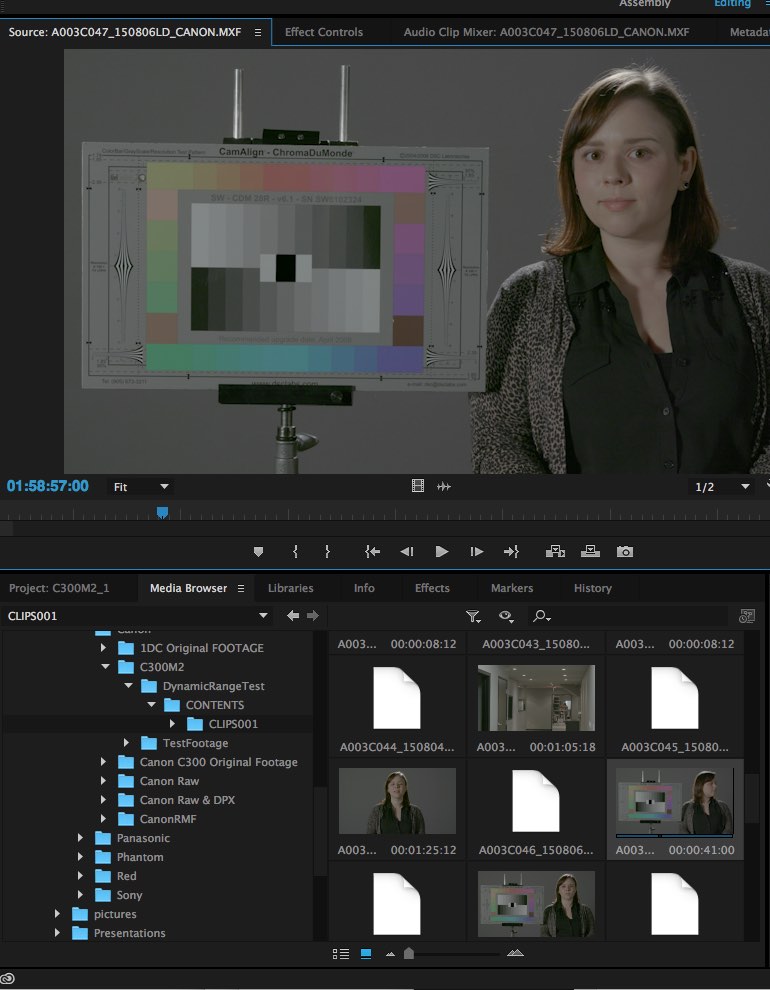 Simply go to the Media Browser window (which could move around based on your layout) and locate your downloaded media. Note that you have to go through the full file structure of the media to find your clips, all the way to the CLIPS folder. My files are found under DynamicRangeTest -> CONTENTS -> CLIPS001. Then you'll get a list of all your clips and you can import them. To import, you can either drag clips directly to a timeline or right click and select 'Import'. This will bring clips into the project, as seen below.
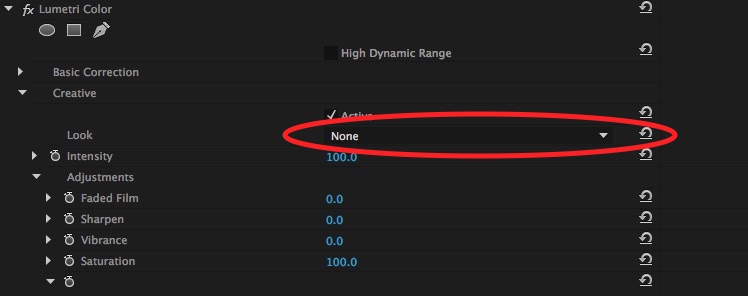
 Premiere can apply LUTs to Canon Log footage via the Lumetri Color effect, found under Effects tab -> Color Correction -> Lumetri Color. Drag the effect to your clip and then click on the 'Effects Control' tab above your viewing window. Adobe has expanded this tool a bit now to have many color options; applying a LUT is now under the 'Creative' drop down. Once there, click on the 'Look' button and browse for the desired LUT. You'll need a LUT to apply here of course, which you can find in our previous post on 3D LUTs for the C300 Mark II.
 Adobe also has Lumetri preset Canon Log LUTs under the Lumetri Presets folder in the Effect panel.
Avid Media Composer
The latest version of Avid Media Composer supports the XF-AVC format, no extra plugins required. To import the footage, create a bin, and just go to the File -> Link to Media.
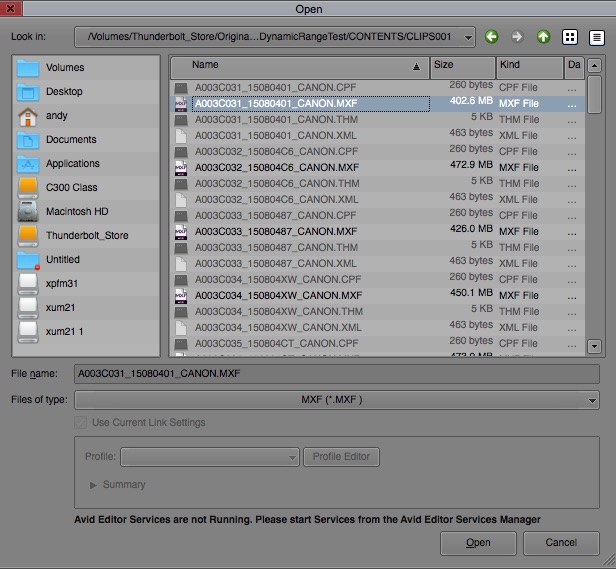 This will launch a file browser where you can navigate to the footage. You'll have to navigate all the way to your actual clips, which is my case are found in DynamicRangeTest -> CONTENTS -> CLIPS001. XF-AVC footage is stored in MXF format, so make sure you select MXF from the 'Files of Type' drop down. Then you can select all of the files in that folder for importing.
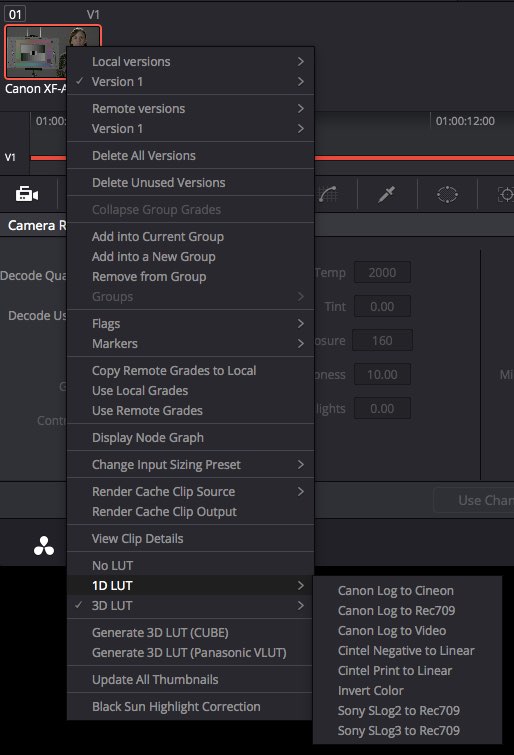
 Once you have the footage imported you might want to apply a LUT (Look Up Table), which I do because I shot in Canon Log 2. To do this, right click (option click) on the clip in the bin and select 'Source Settings'. From here you can add a LUT; Avid has one for C-Log to REC709 built-in, or you can use the new C-Log2 LUTs we posted previously.
DaVinci Resolve
DaVinci Resolve is always fast to update and work with the latest formats, so XF-AVC has been supported for sometime now. Resolve 12 is a great color grading application, and it can now also be used for editing. To import footage, start a new project and find your footage in the Media Storage tab (upper left corner). You'll have to navigate all the way to your actual clips, which is my case are found in DynamicRangeTest -> CONTENTS -> CLIPS001. Then you should see all the clips in either thumbnail or list view.
 Drag your clips into the footage bin, and you are ready to add them to a timeline and start editing. Note the file format is XF-AVC, as displayed on the right bottom part of the screen.
 Once on a timeline, you can apply LUTs easily to the footage. Just right click on the clip and apply the correct 1D or 3D LUT. Resolve hasn't added the C-Log 2 LUTs yet, but you can use the 3D LUTs we posted about previously.
 That's it for now; hopefully this guide will make your workflow process a little easier. Have any questions or comments about working with XF-AVC footage? Leave a comment or question below.
If you want to learn even more about the Canon C300 Mark II, make sure to check out our two-day In-Depth: C300 Mark II workshop coming up in Chicago, NY, and LA.